
Common Problems with Porous Stones in Lab Testing and How to Avoid Them
I’ve lost count of how many times a simple test got delayed because of one tiny thing: the porous stone. These little discs might seem insignificant, but if something goes wrong with them, the entire test can go off track—and trust me, it happens more often than you’d think.
Porous stones in soil testing are prone to issues like clogging, cracking, or losing saturation, all of which compromise test reliability. Understanding these common problems and learning how to avoid them ensures smoother workflows and more accurate results.
Whether you’re running triaxial, consolidation, or permeability tests, treating your porous stones with care will save you headaches—and data errors.
Clogging Due to Fine Particles
The first issue I ever faced with porous stones was slow drainage1. It turned out the stone was packed with fine clay particles.
Clogging happens when fine soil particles2 block the microscopic pores in the stone, restricting water flow and affecting test outcomes, especially in fine-grained or silty samples.
How to Avoid Clogging:
- Use filter paper between soil and porous stone
- Rinse immediately after each test with clean, de-aired water
- Run periodic ultrasonic cleaning to dislodge trapped fines
| Cause | Prevention Tip |
|---|---|
| Clay or silt particles | Add a filter disc |
| Residual soil buildup | Clean right after test |
| Repeated use without soaking | Use ultrasonic bath weekly |
Clogged stones often cause unexpected back pressure buildup and inconsistent saturation—easy to miss if you’re not watching closely.
Cracks or Fractures from Improper Handling
One careless drop. That’s all it takes. I’ve seen brand-new stones crack on day one because someone rushed during setup.
Porous stones3, especially ceramic ones, are fragile and prone to cracking if dropped, over-tightened, or exposed to thermal shock4. Cracks reduce pressure uniformity and compromise test validity.

How to Prevent Damage:
- Handle with clean gloves—never grip them too tightly
- Avoid overtightening during placement
- Store them in padded trays or foam-lined boxes
| Handling Risk | What Can Go Wrong | Prevention |
|---|---|---|
| Dropping on hard surface | Hairline fractures | Use soft trays |
| Using metal tools | Scratching or cracking | Use plastic tools |
| Thermal shock | Expansion/contraction cracks | Avoid rapid temp |
If you see visible fractures or feel uneven pressure during loading, it’s time to replace the stone.
Loss of Saturation Before Testing
I once started a triaxial test assuming the stone was fully saturated—spoiler: it wasn’t. The test failed halfway.
If porous stones lose saturation, they trap air, which skews pore pressure readings5 and reduces test accuracy—particularly in CU or CD triaxial testing6.

Tips to Maintain Saturation:
- Always vacuum saturate stones before use
- Keep them submerged in de-aired water between tests
- Minimize time between saturation and setup
| Problem | Result | Solution |
|---|---|---|
| Air trapped in pores | Incorrect pressure readings | Vacuum-saturate thoroughly |
| Drying before use | Uneven drainage during test | Keep soaked until use |
Losing saturation just before shearing? It can render hours of prep work useless. Don’t risk it.
Using the Wrong Type or Size
Not every stone fits every test. I’ve seen oversized stones that disrupt sample geometry and undersized ones that lead to edge leakage.
Choosing the wrong porous stone—whether in pore size, thickness, or diameter—leads to pressure imbalances7, leakage, or invalid test results.
How to Choose Correctly:
- Match the diameter to your sample mold (no overhang)
- Select pore size based on soil grain size
- Check compatibility with test type (triaxial, consolidation, etc.)
| Mistake Type | Common Effect | What to Check |
|---|---|---|
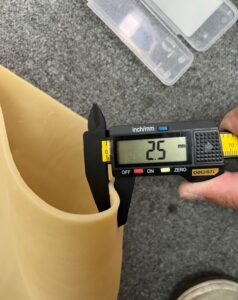
| Stone too thin | Cracks under stress | Use ≥6mm for triaxial tests |
| Oversized diameter | Edge seepage and pressure loss | Must match sample mold |
| Incompatible material | Corrosion or non-uniform flow | Use ceramic for most soils |
If you’re working with fine-grained clays, a 5–10 micron pore size is ideal. For coarse soils, go higher—up to 15 microns.
Conclusion
Porous stones are tiny, but their impact is huge. Whether it’s clogged pores, hairline cracks, or lost saturation, these issues can wreck your results before the test even starts. Handle them with care, choose the right specs, and clean them like your data depends on it—because it absolutely does.
-
Understanding the causes of slow drainage can help you prevent issues with porous stones in the future. ↩
-
Exploring this topic will provide insights into maintaining effective drainage in porous materials. ↩
-
Understanding porous stones can help you handle them properly and avoid damage. ↩
-
Learning about thermal shock can prevent costly mistakes when working with sensitive materials. ↩
-
Exploring pore pressure readings will enhance your knowledge of soil behavior and testing accuracy. ↩
-
Understanding triaxial testing is crucial for accurate soil analysis and engineering applications. ↩
-
Exploring the causes of pressure imbalances can provide insights into maintaining test integrity and reliability. ↩

One Response