I used to treat membranes like “just a sleeve.” Then I realised their stiffness can quietly bend the data.
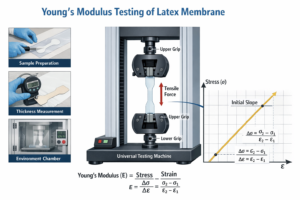
Young’s modulus tells you how stiff a latex membrane is. In triaxial testing, membrane stiffness affects radial restraint, volume change signals, and even the shape of your stress–strain curve.
Here’s why it matters—and how I use it in real lab decisions.
What Is Young’s Modulus and Why It Matters in Latex Membranes?
Young’s modulus is simply “how hard it is to stretch something.” Higher E means stiffer.
For latex membranes, Young’s modulus describes how much the membrane resists deformation under stress—directly influencing how much extra restraint the specimen experiences.

If we keep it simple, Young’s modulus (E) is the slope of the stress–strain line in the elastic range. When E is high, a material resists stretching; when E is low, it stretches easily. In triaxial testing, the membrane is stretched by cell pressure and by the specimen’s radial strain. So the membrane has its own “opinion” about how the specimen should deform.
Why should you care? Because the membrane is always present at the boundary where we assume the confining pressure σ₃ is clean and uniform. A stiffer membrane (higher E) adds extra radial restraint, like a small extra confinement that the gauge doesn’t show. This can slightly inflate apparent strength, smooth out dilation, and change the volume-change signal. A softer membrane (lower E) reduces that added restraint, but it can also be more prone to wrinkles and bulging if the fit isn’t perfect.
Another important point: latex is not a perfectly linear elastic material. E can appear different depending on strain range, strain rate, and temperature. So in practice, I don’t chase a single “magic number.” I use E as a comparative tool: batch-to-batch consistency, thin vs thick grades, and latex vs alternative materials.
If you want a quick mental model:
- Higher E → more restraint → safer mounting but more bias risk.
- Lower E → less restraint → better fidelity but needs better handling.
My short note on “what to log” is here: membrane stiffness notes.
| Concept | In plain words | Why it matters |
|---|---|---|
| Young’s modulus (E) | Stiffness to stretching | Boundary restraint |
| Higher E | Harder to stretch | Can inflate apparent strength |
| Lower E | Easier to stretch | Needs careful mounting |
How Membrane Stiffness Affects Stress–Strain Measurements in Triaxial Tests
The specimen doesn’t deform alone. The membrane fights back—quietly.
A stiffer membrane raises system stiffness, reduces radial strain, and can shift q–ε curves, pore pressure evolution (CU), and volume change (CD).

When we plot deviator stress q versus axial strain εₐ, we want the curve to reflect soil behaviour. But membrane stiffness nudges the boundary condition. A higher-E membrane resists radial expansion, which can make the specimen look slightly “stronger” or “stiffer” than it really is—especially for soft clays or specimens with noticeable radial strain. This effect can show up as:
- a slightly steeper initial slope (apparent stiffness),
- a slightly higher peak q,
- a muted or delayed dilation signal in dense sands,
- and sometimes less dramatic pore-pressure change in CU tests.
In CD tests, the big risk is volume-change interpretation. Wrinkles or uneven tension can create “breathing” curves. A stiffer membrane might reduce visible breathing, but it can also mask small true dilation. A softer membrane gives more faithful volume response, but it must be seated perfectly.
In CU tests, pore pressure is the treasure. Any micro-leak or boundary change can shift the effective stress path. A stiffer membrane can change the radial strain pattern and thus influence excess pore pressure development—subtle, but real when you compare batches.
That’s why I like to keep membrane choice consistent within a test campaign. If we must change membranes mid-program, I run a short dummy-cylinder pressurisation baseline to see how the system behaves before blaming soil differences: baseline method.
| Test type | Where stiffness shows up | My priority |
|---|---|---|
| UU | Peak strength trend | Reliable sealing |
| CU | u-excess and stress path | High B, stable boundary |
| CD | volume curve and dilation | Smooth, wrinkle-free mount |
Factors Influencing the Young’s Modulus of Latex Membranes
E is not fixed. It changes with material, processing, and the lab environment.
Young’s modulus varies with latex formulation, curing, wall thickness, temperature, strain rate, aging, and even storage conditions like UV and ozone exposure.

If you’ve ever picked up two membranes that “feel” different, you’ve already met the practical side of Young’s modulus. A few real-life factors move E around:
- Formulation: natural latex purity, additives, and surface treatments (like chlorination) can change stiffness.
- Curing and processing: curing time and temperature affect crosslink density, which affects E.
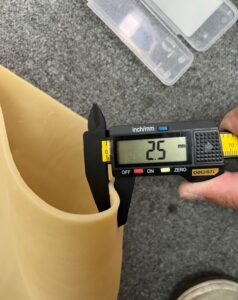
- Wall thickness & stretching: thickness doesn’t directly equal E, but thicker walls often behave “stiffer” in the system because they carry more hoop force at the same strain. Over-stretching during mounting can thin the wall and effectively change local stiffness along the length.
- Temperature: warm latex is softer; cool latex is stiffer. In long tests, day-night lab swings can change stiffness mid-run.
- Strain rate: latex is viscoelastic—load it faster and it can appear stiffer.
- Aging: UV, heat, oxygen, and ozone can make latex brittle or tacky, changing its elastic response and tear resistance.
This is why membrane specialists talk about consistency more than perfection. In a precision program, you want membranes with stable behaviour across the batch and across time. That means controlled storage, lot traceability, and thickness tolerance—plus a habit of logging what you used.
If you need a quick “what changes E?” poster for the lab wall: E-factor checklist.
| Factor | Pushes E… | Practical sign |
|---|---|---|
| Cooler temperature | Up | Harder mounting |
| Faster strain rate | Up (apparent) | Snappier response |
| Aging/UV | Unstable | Brittle feel, cracks |
| Different lot | Up or down | New scatter in results |
Selecting the Right Membrane for Precision Testing: Practical Guidelines
Precision testing is about controlling variables—membrane stiffness is one of them.
Choose membranes with consistent lot properties, correct ID fit, and a thickness/elasticity balance matched to soil type, σ₃, and test purpose; verify with quick baseline checks.

When results need to be defendable, I follow four simple rules:
1) Keep membranes consistent within a campaign
Switching thickness or material mid-series can create scatter that looks like soil variability. If a change is unavoidable, document it and run a short baseline check.
2) Pick fit first (ID ≈ OD)
A membrane that’s too small forces over-stretch, thinning the wall and raising tear risk. Too large creates folds that corrupt volume change. I keep a snug band and an alternate band for each diameter: size matching guide.
3) Balance fidelity vs durability
For soft clays and CD fidelity, I prefer thinner, smooth membranes—often transparent for visual checks. For angular sands or high σ₃, I use a more robust wall or abrasion-resistant surface to prevent pinholes. The goal is fewer reruns, not “the thinnest possible.”
4) Prove the system quickly
A dummy-cylinder pressurisation test with the same membrane shows you controller drift and thermal effects. It’s the fastest way to separate soil behaviour from boundary behaviour: dummy SOP.
Here’s a practical selection table I use:
| Situation | Recommended approach | Why |
|---|---|---|
| High-precision CU (clay) | Thin–medium, high consistency | Protect u-path and B |
| CD with small volume changes | Thin, smooth/transparent | Better volume fidelity |
| High σ₃, angular sand | Medium–thick or resistant surface | Fewer pinholes |
| Long-duration tests | Medium wall + temp control | Lower creep risk |
As HOWDY, we try to make this easy: stable lots, tight wall control, and clear thickness options—plus custom designs when rigs are complex. If you want a short checklist to send to your lab team, here it is: precision membrane checklist.
Conclusion
Young’s modulus isn’t just theory—it’s a quiet boundary force. Control it, log it, and your triaxial results become easier to trust.