Mounting tools can save your test—or ruin it—depending on how calmly you use them.
Proper membrane mounting prevents leaks, tears, wrinkles, and false volume change, protecting B-values, stress–strain curves, and pore-pressure data across UU, CU, and CD tests.
Here’s my simple, repeatable playbook for fast, damage-free mounting.
Why Proper Mounting Is Critical for Accurate Testing
A clean mount is the quiet hero behind every honest curve and stable B-value.
Good mounting controls folds and friction, keeps seals tight, and preserves geometry—so stiffness, peak strength, and dilation reflect soil, not tool marks or leaks.

Dive deeper: where mounting wins or loses your data
My first week running CU tests, I treated mounting like a warm-up. Big mistake. A tiny wrinkle near the base acted like a bladder; the volume curve “breathed” while cell pressure changed. Once I slowed down and used the right tools, B jumped from 0.88 to 0.96—same clay, same rig, better mount.
Mounting tools matter because they manage three risks: (1) over-stretch, (2) edge cuts, and (3) trapped air. A vacuum stretcher spreads strain evenly so mid-height isn’t thinned like a balloon neck. Deburred caps and smooth rings stop razor-thin cuts at the ends. Transparent membranes (when available) let me see folds and bubbles before consolidation. For quick reminders, I keep a one-page card: mounting essentials.
Signals that mounting was honest
- High B-value (CU): ≥0.95 after steady back-pressure.
- Quiet volume curve (CD): no “breathing” with cell steps.
- Smooth q–ε: no early softening without fabric reason.
| Risk | Tool/control | Result |
|---|---|---|
| Over-stretch | Vacuum stretcher, snug ID | Even wall, fewer splits |
| Edge cuts | Deburred caps/rings | End seals survive shearing |
| Trapped air | Bubble test, transparent wall | Stable B, clean curves |
Small habits build trust in every point you plot: pre-test checklist.
Step-by-Step Guide to Using Membrane Mounting Tools
I follow the same slow rhythm every time—no shortcuts, no drama.
Inspect hardware, dummy-fit the membrane, use moderate vacuum in steps, seat ends in parallel, then bubble-test before saturation.

Dive deeper: my 10-step routine with the core tools
1) Inspect & deburr caps/rings with fine abrasive; wipe with alcohol.
2) Clean porous stones (rinse/ultrasonic) so trapped grains can’t punch pinholes.
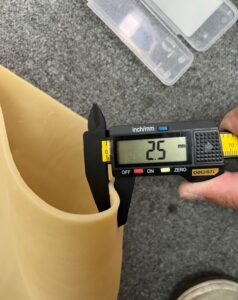
3) Dummy mount the membrane on a smooth cylinder to confirm ID band and elasticity.
4) Set the vacuum stretcher; ramp vacuum in steps, not one big hit.
5) Slide the membrane down steadily; release vacuum gradually to avoid necking.
6) Seat the ends; check cap parallelism and apply a thin lube film only at interfaces.
7) Bubble test at low cell pressure; watch for slow, sneaky leaks.
8) CO₂ flush and de-aired water for saturation; protect against trapped air.
9) B-check (CU); if B < 0.95, suspect micro-leak or wrinkle first, not “more time.”
10) Log the mount (ID, wall, notes), so the team learns fast.
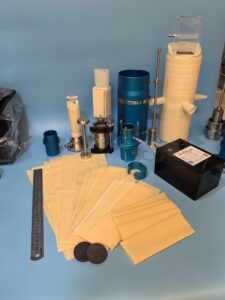
Essential tools on my bench: vacuum stretcher, alignment jig, deburring kit, transparent sleeves, low-pressure regulator for bubble tests, and a small LED torch. I keep a laminated SOP beside the cell: step card and a 60-second leak mini-check: quick leak test.
| Tool | Purpose | Tip |
|---|---|---|
| Vacuum stretcher | Even expansion | Step vacuum, don’t slam |
| Alignment jig | Parallel caps | Re-check before lock |
| Deburring kit | Smooth edges | Weekly polish habit |
| LED + mirror | Visual check | Catch fold shadows |
If any fold survives the bubble test, I re-mount. Ten minutes now saves a day later: full SOP.
Avoiding Common Pitfalls and Tears
Most failures start with haste: too much vacuum, wrong size, or hidden burrs.
Use snug ID (not tight), moderate vacuum, edge polishing, and protective sleeves for sands; never chase wrinkles—re-seat early.

Dive deeper: reading failure fingerprints—and fixing them fast
Mid-height splits? That’s usually over-stretch from an undersized ID or a vacuum spike. Step the vacuum, and move to the alternative ID band. End-rim nicks point to burrs/misalignment; polish and re-check cap parallelism. Pepper-dot pinholes after saturation are the calling card of angular grains or rough stones; clean stones and use a thicker wall or a short protective sleeve during seating (remove before test).
I keep a tiny “if-this-then-that” table taped to the frame: fault map. When CU B-values stall around 0.88–0.92, I assume micro-leak first. Bubble test again at low pressure; a single slow streamer gives the game away. For CD, a breathing volume curve means folds or bubbles; transparent membranes help me see and fix them.
| Symptom | Likely cause | Immediate move |
|---|---|---|
| B < 0.95 (CU) | Micro-leak | Re-seat; re-test |
| Early softening | Membrane restraint/fold | Re-mount thinner/snugger |
| Noisy volume (CD) | Fold/bubble | Re-seat; smooth wall |
| Rim nicks | Burrs/tilt | Deburr; align caps |
Two more quiet killers: storage and over-lubrication. Heat/UV age latex; store cool and dark. A thin lube film at interfaces is enough—too much invites folds. My audit list lives here: mount audit.
HOWDY Tools and Support for Stress-Free Lab Setup
I keep it simple: right sizes, clear SOPs, and quick help when something feels off.
At HOWDY, we supply snug ID bands, thin/medium/thick and transparent options, plus mounting accessories and traceable lots—B2B support when you need it.

Dive deeper: what my team actually provides
Labs tell me they don’t need fancy, they need predictable. So we stock two ID bands for common diameters (38, 50, 70, 100 mm) and two wall grades per band. Thin (often transparent) for clean CD volume curves; medium/thick for sands and higher σ₃. Every lot leaves with thickness-tolerance notes and labels so repeat orders behave the same: spec sheet.
On tools, we offer vacuum stretchers, simple alignment jigs, soft edge-polishing kits, and a bubble-test regulator to keep you in the “low and slow” zone. For trickier rigs—ports, flanged ends—we design custom membranes so plumbing sits naturally and seals stay honest. Prototype first, then scale if it saves you time: custom request.
I also share the boring stuff that works: a one-page mounting flow, a leak-check card, and a Monday deburr routine. These are free because advice beats reruns—always. If you’re unsure between two walls, we’ll ship a split pack so your team can trial both and log the results. That’s how we keep your week calm and your curves clean: toolkit list and leak card.
| Option | When I suggest it | Why it helps |
|---|---|---|
| Thin transparent | CD on clays | Spot folds/bubbles instantly |
| Medium wall | UU/CU routine | Fast sealing, robust handling |
| Thick/chlorinated | Angular sands, high σ₃ | Fewer pinholes, durable |
| Custom flanged/ported | Sensor lines, edge slip | Faster mounts, tight seals |
Conclusion
Mount slowly, size honestly, test for leaks—then let clean curves reward your calm routine.