I know the frustration: a tiny tear ruins hours of setup—and your data.
Latex membranes tear from wrong sizing, sharp edges, over-stretching, or rushed mounting; fix with correct diameter/thickness, deburred hardware, gentle vacuum mounting1, and quick leak checks.
Let’s stop the tears and rescue your schedule.
What are the common causes of latex membrane tearing2 in triaxial tests?
Small mistakes add up: sizing, edges, speed, and storage. Each weakens the membrane.
Typical causes: undersized membranes, burrs on caps/rings, aggressive vacuum, sharp grains, poor storage (UV/heat), and dry mounting without lubrication.
On a Monday morning in Chicago, I punctured three membranes in a row. Not the soil’s fault. A hairline burr on the base ring. Once I polished and re-lubed, zero failures that week.
Quick diagnosis map
- Tears near ends? Likely burrs/tilt at caps or rings.
- Mid-height splits? Over-stretching or undersized membrane.
- Pinholes after saturation? Sharp grains or rough stones.
- Random cracking in storage? UV/heat aging.
| Symptom location | Likely cause | Fast fix |
|---|---|---|
| At cap edge | Burrs, misalignment | Deburr, align, add lube |
| Mid-height | Over-stretch, thin wall | Use stretcher; step up thickness |
| Near base | Sand grains | Clean stones; sleeve for coarse soils3 |
| In storage | Aging/ozone | Cool, dark, sealed storage |
For a printable checklist: tear causes & fixes.
How do I choose the right membrane size, thickness, and material?
Start with diameter and particle size, then stress level and test type.
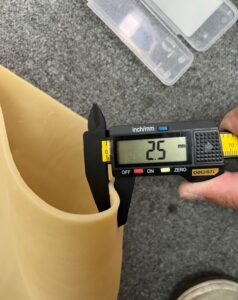
Pick membrane ID ≈ specimen OD (snug, not tight), thickness to match D50 and σ₃, and high-purity latex or chlorinated latex4 for chemical/abrasion needs.

I keep two thickness options per diameter. For soft clays, thinner reads volume change cleanly. For sands or higher σ₃, thicker saves you from edge cuts and bulging.
Sizing & thickness guide (rules of thumb)
| Specimen Ø | Fine clay (D50 < 0.02 mm) | Silt/silty clay | Fine sand | Notes |
|---|---|---|---|---|
| 38–50 mm | 0.30–0.35 mm | 0.35–0.45 mm | 0.45–0.60 mm | Match ID to OD; avoid folds |
| 70–100 mm | 0.35–0.45 mm | 0.45–0.55 mm | 0.60–0.80 mm | Step up with higher σ₃ |
Material tips:
- Natural latex: best elasticity, easy mounting.
- Chlorinated latex: better chemical/abrasion resistance, slightly stiffer.
- Transparent latex: easy wrinkle/pinhole checks during mounting.
Grab my quick selector: size/thickness helper.
What are the best practices for mounting5 and handling membranes safely?
Slow hands win. Protect edges, control vacuum, and watch for wrinkles.
Deburr and clean hardware, use a membrane stretcher, apply light lubrication, mount under moderate vacuum, and perform a low-pressure bubble test6 before saturation.

Here’s my calm, repeatable routine—the one that saved me from late-night reruns.
My mounting routine (10 gentle steps)
- Inspect & deburr caps/rings; wipe stones clean.
- Pre-fit membrane on a dummy cylinder; confirm no folds.
- Light lube (thin film) on ends—not the whole height.
- Vacuum stretcher to expand; avoid max vacuum spikes.
- Slide down slowly, releasing vacuum in small steps.
- Seat ends evenly; check cap parallelism.
- Bubble test at low cell pressure (tiny leaks show first).
- CO₂ flush then de-aired water for saturation.
- B-value check; if low, recheck seals, not just time.
- Record membrane ID, thickness, and observations.
| Pitfall | What it causes | Prevention |
|---|---|---|
| Over-vacuum | micro-tears | Moderate vacuum; step release |
| Dry mounting | friction cuts | Thin lube at interfaces |
| Folds/wrinkles | false dilation | Re-seat before locking |
| Rough stones | pinholes | Smooth/replace stones |
Step-by-step visuals: mounting guide and leak check mini-card.
Who should I trust for membranes—and why does quality matter more than price?
Because a torn membrane costs more than any discount. Time is your money.
Reliable suppliers control latex purity, wall tolerance, and curing; they offer consistent IDs, multiple thickness grades, and batch traceability7—cutting reruns and data noise.

I run a B2B factory, so I’m biased toward consistent over cheap. When batches drift in thickness by ±0.1 mm, your volume curves drift too. Ask for tolerances and batch QA, not only price.
Supplier vet list (questions I actually ask)
- Wall tolerance & ID tolerance? Provide numbers, not adjectives.
- Batch traceability? Lot codes with QA records.
- Surface finish? Smooth, dust-free, no talc residue.
- Options? Thin/medium/thick per diameter, transparent/chlorinated.
- Lead times & MOQs? Realistic, not wishful.
| Spec | Good supplier | Risky supplier |
|---|---|---|
| Thickness tolerance | ≤ ±0.03 mm | “Around 0.1 mm” |
| ID matching | Snug range per Ø | One size fits all |
| Batch QA | Certificates on request | “We test sometimes” |
| Options | Multiple grades | Single generic grade |
If you need consistent lab supply, here’s a simple vendor checklist: supplier QA questions.
And yes—if you want transparent membranes for easier mounting checks, I can help: Howdy membranes.

Dive deeper: stopping tears before they start
Membrane tearing rarely comes from one big mistake; it’s a chain of small ones. The easiest win is edge control8. A single burr acts like a razor. I keep a small kit—fine files, Scotch-Brite, and alcohol wipes. Five minutes of polishing on Monday saves five membranes by Friday. Next is fit. If your membrane’s ID is too small, you’ll over-stretch it during mounting; too large, and you’ll chase folds that later behave like tiny bladders. I pick a snug ID and confirm with a quick dummy mount before touching the real specimen: pre-fit routine.
Vacuum discipline matters. Maximum vacuum looks efficient but creates micro-cracks you won’t see until saturation. I step vacuum down in stages and release it gradually as the membrane seats. For coarse or angular soils, I use a slightly thicker wall or a short protective sleeve during seating; once the membrane is set, the sleeve comes off. Storage is the quiet culprit: heat and UV age latex. I store membranes in opaque bags, cool and dry, and rotate stock like perishables.
Finally, I log every failure. Where did it tear? Which cap? What vacuum? Over time, patterns shout the answer. Your goal isn’t perfection; it’s predictability—a mounting routine so calm and boring that nothing tears and nothing surprises you.
Conclusion
Choose snug size and suitable thickness, tame edges and vacuum, and let quality save your time.
-
Discover the principles of vacuum mounting and its impact on membrane performance. ↩
-
Learn about the typical issues that lead to latex membrane tearing to prevent future problems. ↩
-
Find out how different soil types impact the effectiveness of latex membranes. ↩
-
Explore the differences between chlorinated and natural latex to make informed choices. ↩
-
Discover effective techniques for mounting latex membranes to ensure durability and reliability. ↩
-
Learn about the bubble test and its significance in ensuring membrane integrity. ↩
-
Learn about the importance of batch traceability for quality assurance in membrane production. ↩
-
Understand the critical role of edge control in preventing membrane damage. ↩