I’ve seen this confuse even experienced labs: the sample “compresses,” but the soil didn’t really change that much.
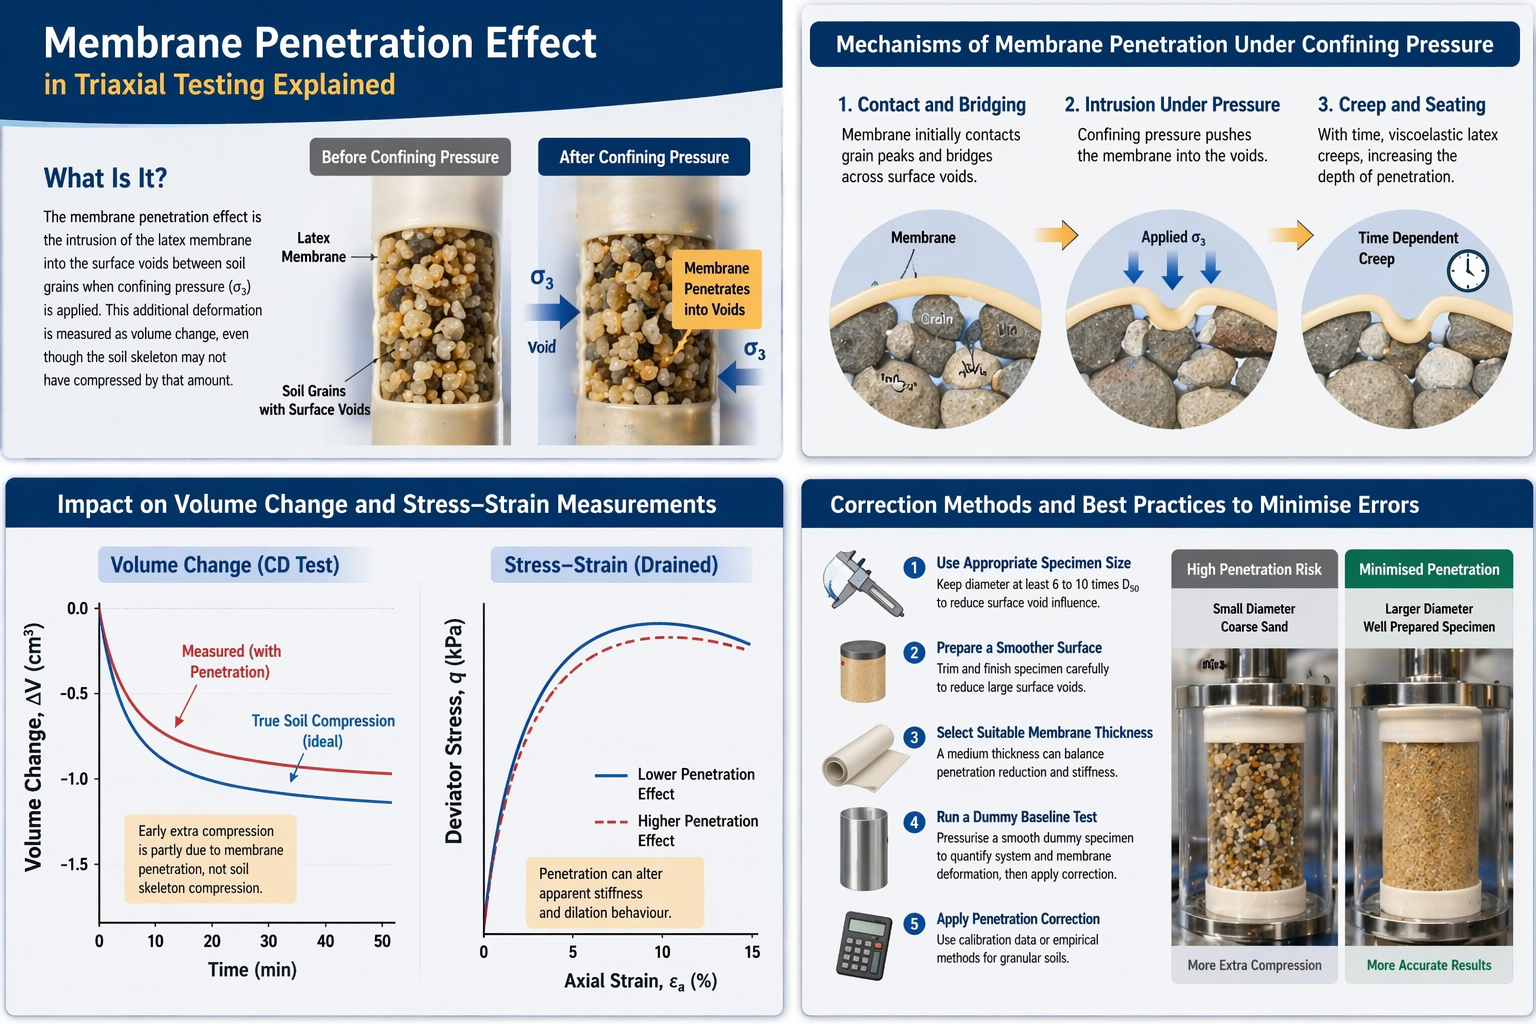
The membrane penetration effect happens when the latex membrane is pushed into the surface voids between grains under confining pressure, creating extra apparent volume change and small biases in stress–strain interpretation.
Let’s make it feel simple and practical.
What Is the Membrane Penetration Effect in Triaxial Testing?
It’s not a “soil behaviour.” It’s a boundary effect at the specimen surface.
Membrane penetration is the intrusion of the membrane into grain voids under σ₃, causing measured volume change to include membrane deformation—not just soil skeleton deformation.

Here’s the easiest picture in my head: imagine wrapping a sponge with a thin rubber glove. If you squeeze the sponge, the glove doesn’t stay perfectly smooth—it presses into the little holes on the surface. In triaxial testing, granular soils (especially sands) have surface voids and roughness. When you apply confining pressure σ₃, the membrane is pushed into those tiny gaps. That creates an apparent “extra compression” in your volume measurement.
This matters because many labs measure volume change indirectly—through burettes, pressure/volume controllers, or cell volume tracking. Those systems can’t separate “soil volume change” from “membrane volume change.” So the early part of a consolidation curve can look more contractive than it should. Then later, as the membrane seats and stabilises, the curve may flatten—making people think the soil suddenly became less compressible.
The effect is strongest when:
- grains are coarse or angular,
- σ₃ is high,
- specimen diameter is small relative to particle size,
- the membrane is very soft/thin (easier to press into voids).
I always remind myself: membrane penetration is not “wrong.” It’s just something you must recognise, especially in CD tests where volume change is the headline. My quick mental checklist lives here: penetration quick check.
| Condition | Penetration tendency |
|---|---|
| Higher σ₃ | Higher |
| Larger grains | Higher |
| Rough surface | Higher |
| Larger specimen Ø | Lower |
| Stiffer/thicker membrane | Lower (but more restraint) |
Mechanisms of Membrane Penetration Under Confining Pressure
Three forces are doing the work: pressure, roughness, and time.
Cell pressure pushes the membrane into surface voids; rough grains create “pockets”; viscoelastic latex creeps, increasing intrusion during holds.

Mechanically, membrane penetration is the result of contact pressure acting on a flexible wall. When σ₃ rises, the membrane is pressed against the specimen. If the specimen surface were perfectly smooth, the membrane would simply sit flat. But in sand, the surface is more like a mini mountain range—grain tops, grain edges, and valleys between grains.
So the membrane deforms locally:
- It bridges over a void at first,
- then under pressure it sags into the void,
- then with time it creeps and seats deeper.
That last part—time—is why penetration can be worse in long-duration tests. Latex is viscoelastic. Under constant stress, it continues to deform slowly. So even if you apply σ₃ in steps, you may see ongoing “volume change” that partly reflects membrane seating rather than true soil compression.
The interaction also depends on membrane properties:
- Thickness: thicker walls are harder to push into voids, but they add hoop stiffness (restraint bias).
- Elastic modulus: higher stiffness reduces local sagging, but may influence stress–strain response.
- Surface finish: tacky or high-friction surfaces can “hang” on grains and deform unevenly.
So, penetration is a local deformation effect, but it shows up as a global measurement error because we measure volume in bulk. For a short note on what changes penetration the most, see: mechanism notes.
| Driver | What it does | What you notice |
|---|---|---|
| σ₃ increase | More pushing force | Extra early “compression” |
| Grain roughness | More void pockets | Larger bias in sands |
| Time under load | More creep seating | Drift during holds |
Impact on Volume Change and Stress–Strain Measurements
This effect hits volume curves first—but it can also influence how you interpret strength and stiffness.
Membrane penetration inflates apparent contraction, can distort dilation signals, and may slightly shift stiffness/peak interpretations by altering boundary conditions and effective radius assumptions.

In my experience, the biggest damage is to volume change in drained tests. If penetration adds extra “contraction,” you might conclude the soil is more compressible than it is. That matters for settlement predictions and for understanding dilatancy behaviour. In dense sands, penetration can also hide true dilation: the soil tries to dilate, but the membrane is still seating into voids, so the net signal looks flatter.
For stress–strain, the influence is usually smaller—but it’s still there. Penetration changes the boundary contact pattern. It also changes how we think about specimen radius during deformation. If you’re doing high-precision stress calculations, small radius shifts and local restraint can nudge your curves. This becomes more noticeable at:
- high σ₃,
- coarse/rough specimens,
- small diameters (38 mm with coarse sand is a classic trap),
- very long holds.
The worst scenario is when the effect is misread as soil behaviour. A “too contractive” consolidation curve may lead you to adjust model parameters incorrectly. Or you might think a sand is less dilative, when in reality your membrane was just sinking into surface voids.
A simple way to spot it: run a dummy-cylinder test (smooth surface) and compare the early volume response. If the sand test shows much higher early contraction than the dummy baseline, penetration is likely a contributor: spotting penetration.
| Measurement | Typical bias from penetration | Risk |
|---|---|---|
| Volume change (CD) | Too much contraction | Wrong compressibility/dilatancy |
| Dilation signal | Muted or delayed | Wrong behavioural interpretation |
| Stress–strain | Slightly altered stiffness/peak | Overconfident comparisons |
Correction Methods and Best Practices to Minimise Errors
You can’t “wish it away.” But you can reduce it and correct for it.
Minimise penetration by proper specimen sizing, smoother preparation, suitable membrane thickness, and baseline calibration; apply penetration corrections for granular soils when precision is required.

Here’s how I handle membrane penetration without turning it into a research project.
1) Reduce the effect at the source
- Use larger specimens for coarser soils. A simple rule: specimen diameter should be at least 6–10× D50 (and higher if the soil is very coarse).
- Prepare a smoother surface. For reconstituted sands, careful tamping and trimming reduce big surface void pockets.
- Choose thickness wisely. A slightly thicker wall can reduce local intrusion, but don’t overdo it—too thick adds restraint bias. I often choose medium for sands at higher σ₃.
- Avoid wrinkles. Wrinkles create extra local pockets and exaggerate penetration.
2) Use baseline checks (my favourite practical tool)
I run a short pressurisation with a dummy smooth cylinder and the same membrane and plumbing. That gives me a system baseline: controller drift + membrane behaviour without soil surface voids. Then I compare it with the sand specimen response. Notes here: dummy baseline SOP.
3) Apply a penetration correction (when needed)
For high-precision work, some labs apply an empirical correction based on grain size, membrane thickness, and calibration tests. I keep it simple: I use calibration runs on known materials and document the correction method in the report, so reviewers can follow the logic: correction worksheet.
| Best practice | Helps because | Most useful for |
|---|---|---|
| Larger specimen Ø | Lowers surface dominance | Coarse sands |
| Medium wall | Reduces local intrusion | High σ₃ |
| Smooth prep | Fewer void pockets | Reconstituted samples |
| Dummy baseline | Separates system vs soil | Long tests |
| Document correction | Transparency | Design-grade reporting |
If you want the shortest checklist possible: control specimen size, pick the right wall, do a baseline, and don’t over-interpret early contraction in sands. That alone prevents a lot of bad conclusions.
Conclusion
Membrane penetration is a real boundary effect—recognise it, reduce it, and correct it when accuracy matters.